The digitization wave in small and midsize business accounting has transformed data entry, thanks in large part to QuickBooks Online’s OCR capabilities. Nearly every accountant or bookkeeper who deals with high volumes of receipts and invoices has wrestled with getting those documents into their accounting system—quickly, accurately, and with strong documentation support.
But what happens after those receipts and bills are emailed or scanned into QuickBooks? Even with the best OCR, transactions usually need further review and categorization before they’re ready for reconciliation and reporting. That’s where Spreadsheet Sync for QuickBooks Online Advanced comes in, empowering efficient, bulk management of your financial data—straight from Excel.
Why Spreadsheet Sync Matters After OCR Import
After uploading or emailing receipts to QuickBooks, OCR (Optical Character Recognition) extracts vital information—vendor, date, amount, and sometimes category. But this process is not perfect. You’ll often find:
- Some transactions are miscoded or lack full categorization.
- Attachments may not be reviewed or confirmed.
- You need to recategorize, tag, and post many items in bulk to meet monthly reporting timelines.
With Spreadsheet Sync, you can easily export these transactions to Excel, make bulk edits, categorize transactions, tag those that are reviewed, and then push them back to QuickBooks in one batch—without manually opening each entry in the web interface.
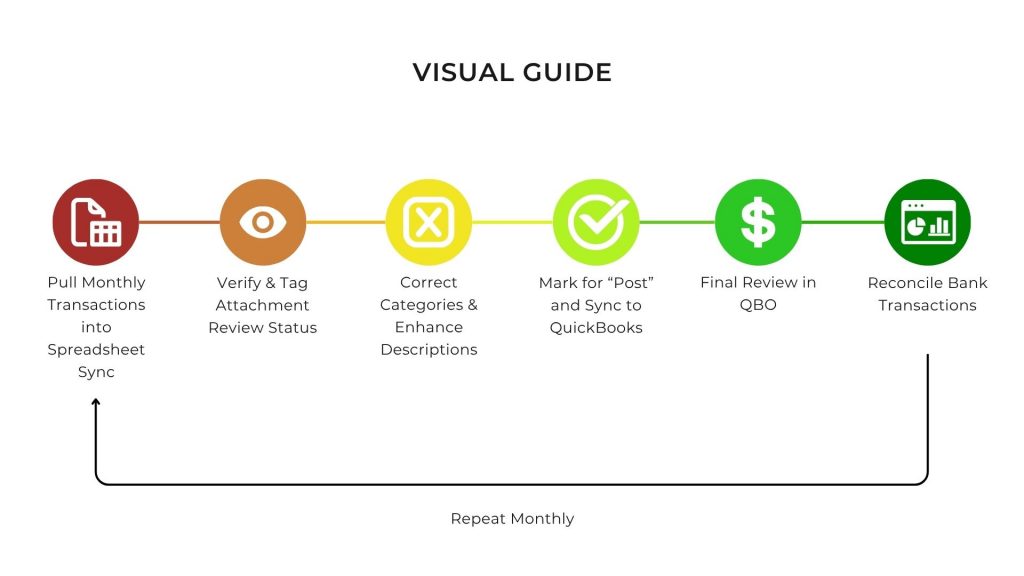
The Ideal Vertical Workflow: One Month at a Time
While it may be tempting to clean up multiple months at once, best practice is to process one month at a time. This ensures greater accuracy, easier reconciliation, less audit risk, and faster approvals.
| Step | Description | Best Practices & Tips |
|---|---|---|
| 1. Pull Monthly Transactions into Spreadsheet Sync | Use date filters to download only one month’s transactions into Excel from your Expense or Bill records. | Smaller batches are easier to audit, review, and correct thoroughly. |
| 2. Review Attachments & Tag Status | Create a column (e.g., “Support Status”) to tag each transaction as Reviewed, Pending, etc. | Use QBO’s Attachments screen or export to verify which entries lack documents. |
| 3. Categorize & Edit Details | Use Excel to update categories, vendors, locations, memos, etc.—and fix any OCR errors. | Excel filters and mass copy-paste can speed up cleanups. |
| 4. Mark for Posting & Sync to QBO | Set “Post?” to “Yes” for every row ready for submission. Then use “Sync to QuickBooks” to push everything back. | Validate before syncing to catch required fields or duplicate issues. |
| 5. Verify Transactions in QBO | Spot-check several random transactions in QBO to confirm support, categories, and accuracy. | Use QBO’s Transaction list with Attachments column enabled for quick visual review. |
| 6. Bank Reconciliation | Now that the period’s data is clean, supported, and posted—you can complete reconciliation confidently. | All entries should cleanly match bank feed items and avoid duplicate expenses. |
| 7. Repeat for Each Month | Once the current month is finalized, move on to the next period. | Stay consistent month by month to maintain compliance and clarity. |
💡 Pro Tip: Add a Custom Field to Track Attachment Review Status
To formalize the document review process, consider creating a custom field in QuickBooks to track a status like “Attachment Reviewed” or “Support Verified.” This field can be synced using Spreadsheet Sync and will be visible on each transaction.
Here’s how to set it up:
- In QuickBooks, go to Settings > Custom fields.
- Click Add custom field and name it (e.g., “Support Status”).
- Choose a Dropdown or Text type.
- Most importantly: Enable the field on both “Expense” and “Bill” forms.
- (Optional) Enable this custom field on checks or POs if needed for additional transaction types.
By syncing this field into your Spreadsheet Sync templates, you can easily filter, mark, and update review statuses directly in Excel—then sync your updates back into QuickBooks, keeping documentation status embedded in your transaction records.
Key Benefits of This Post-OCR Workflow
- Bulk Accuracy: Mass corrections of categories, vendors, and notes can be done in seconds via Excel.
- Audit-Trail Ready: Review status tracking lets you prove due diligence and supporting evidence.
- Better Reconciliation: Clean, supported data ensures your bank feed matches flow seamlessly.
- Client Confidence: When your financials are based on verified data with proper support, your client can trust every number in the report.
Process Overview

Final Thoughts
OCR has given us a head start—but the real power lies in what happens next. With a structured monthly workflow and tools like Spreadsheet Sync, you can confidently categorize, document, and post transactions at scale—in a way that’s efficient, accurate, and audit-ready.
By enabling custom fields for document review, working month-by-month, and syncing clean data back into QuickBooks Online, you eliminate guesswork and chaos—leaving you with financials you can stand behind and clients who trust your process.
Need help setting up your custom templates or tagging workflow? Let us know!


